In the Presentation Views group, click on Outline View.
In the Outline panel, make sure all text from the slides appears in the Outline View.
Use the provided slide layout to help your slide's reading order remain intact.
From Home tab, choose the New Slide drop down menu and select a slide template.
Don't use the Blank slide template.
Ensure the tab order = the reading order.
On the Home tab, click on Arrange and choose Selection Pane (Reorder Objectsfor Mac - PPT 2011 & 2016).
To see the reading order of the slide, tab through the slide and the corresponding
element will highlight.
To re-arrange the reading order, click arrow up/down button on the Selection Pane (Mac: drag layers). The highest number is read first.
Test reading order with the Tab key again.
Add alternative (Alt) text to images and shapes.
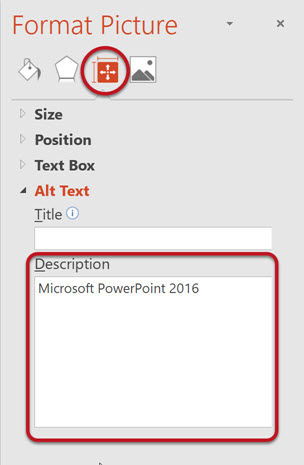
Right click on the image and select Format Picture.
In the Format Picture sidebar, Select theSize & Propertiesicon and chooseAlt Text.
Enter appropriate alternative text in theDescriptionfield only (not the Title field).
Format a list as a list.
Select the text to make into a list and click on the Home tab.
In the Paragraph group, select the Numbering or Bullets icon.
Use Numbering Lists if a sequential order is important to the list.
Use Bullets Lists if all items are of equal value.
Google Slides
Check the outline view
There is no Outline View in Google Slides.
Use the provided slide layout to help your slide's reading order remain intact.
Create a new slide (Slide > New Slide).
Go to Slide menu, click on Apply Layout and choose slide template (not the Blank one).
Ensure the tab order = the reading order.
Tab through the slide and the corresponding element will highlight.
In the slide area, click on the element that you want to change.
To change the reading order, click on Arrange menu > Order Send backward will raise the element to a higher reading order. Bring forward will make the element lower in the reading order.
Test reading order with the Tab key again.
Add alternative (Alt) text to images and shapes.
To insert an image, choose Image from the Insert menu and follow the instructions.
To add Alt text, click on the image. Then in the format menu, select Alt text (at the very bottom of the menu).
Enter alt text in the Description field (not the Title field).
Format a list as a list.
Go to Format menu > Lists and select on of the list styles
Use Numbered lists if a sequential order is important to the list
Use Bulleted lists if all items are of equal value.